How to send files that will print reliably
Watch our artwork setup guide
For best results please supply your files as:
- Format: PDF saved in˜press quality’, ‘PDF/X-1A’, or ˜for printing’ settings
- Layout: Individual pages in reading order
- Safe Margin: 4mm
- Bleed: 3mm (edge to edge colour printing only)
Layout
Please save your file as individual pages in reading order, and don’t arrange it for printing in any way.
For an 8-page booklet, page 1 would be the front outside cover, page 2 would be the front inside cover, and page 8 would be back outside cover.
For 20 A6 table names, please give us either a 20-page PDF or 20 individual files.
Please don’t impose smaller items onto an A4 sheet. Send each item at its finished size, and we’ll arrange it correctly for print.
Please also don’t put any fold lines or cutting lines in your design, as they are not needed and wont look good when printed.
Format
Our ideal file type is a PDF saved in press quality settings. Press quality means fonts are embedded and all colours are converted to CMYK, and so it’s the most reliable way to print what you see on screen.
Microsoft Office documents (Word, Excel, PowerPoint) are not reliable to print from, as they can change layouts and fonts on different computers. To make a PDF please click ‘Save As’ and select PDF for the file type. In Excel you might have to print to a PDF (choose PDF as the printer) to make a file that we can use. Please check your PDF to make sure it looks correct before sending it to us.
We only use PDFs, so any other file type has to go through a conversion process, which takes extra time and might change the fonts, images, colours or layout.
For posters (A2+) that are images (e.g., photographs or art), we’d prefer RGB JPEG or TIFF files.
Safe Margin
It’s best to have a safe margin of at least 4mm+ on each side of your design. This means not putting any important text or borders too close to the edge of the sheet, otherwise they risk getting cut off.
For posters and signage, the safe margin needs to be 10mm, and for PVC banners it needs to be 40mm (so that no part of the design is covered by the eyelets).
Bleed
If you’d like colour printing edge to edge (known as full bleed), your PDF must be saved with 3mm bleed. This is not really possible to do in Microsoft Office documents you need to use a design program like Adobe InDesign, CorelDRAW, or Canva.
3mm bleed means that the page size of your PDF must be larger by 6mm on each dimension. It should just consist of background only, as it will be cut off.
As an example, Business Cards measure 85 x 55mm, so we need a PDF with a page size of 91 x 61mm, which we cut down to 85 x 55mm.
We can print large posters at any size, but for everything else our workflow is based on standard international paper sizes, and it’s best to stick to these:
A0: 841 x 1189mm (with bleed = 847 x 1195mm)
Saving your file in Canva and Adobe Software
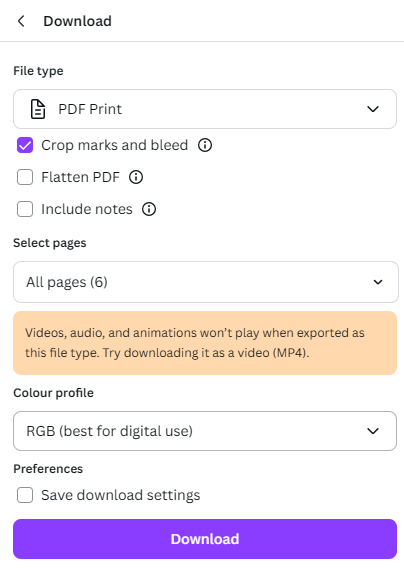
Canva:
If you don’t have a design, then Canva is a quick and easy solution. It’s available online and on your phone, and it’s free to use with lots of templates.
- On the menu bar, select the Share icon.
- Select Download.
- On the File type dropdown, select PDF Print.
- Tick the Crop marks and bleed checkbox.
- Don’t “Flatten PDF”
- Select Download
(For colour profile CMYK is best, but RGB is OK if you are using the free version)
Adobe Software:
-
Choose File > Export (or Save As) and select the Adobe PDF (Print) format. Select the ‘Press Quality’ preset.
-
In the General tab, select View PDF after Exporting. In Marks and Bleeds, select Crop Marks and make sure that bleed is set to 3mm. Click Export.
Photoshop
-
Photoshop isn’t suited to creating design files for print, but the workaround is to print to a PDF instead.
-
Go to Image / Canvas Size and set the units to millimeters.
-
Your canvas size needs to be 6mm larger on each dimension than the finished print size. If the canvas is currently set to the finished size, then tick the Relative box and enter 6m in the Width and Height boxes. Click OK and your document will extend by 3 mm on each edge.
-
Adjust your design if necessary (usually by expanding the background)
-
Print your file as a PDF (eg: select Microsoft Save as PDF as the printer). In the print settings make sure to tick ‘corner crop marks’ and set the bleed width to 3mm. The scale should be 100%. If the page size is larger that’s fine.
Sending us large files
If your files are too large to email, please send them via our WeTransfer page.